When to Call a Mold Remediation Expert
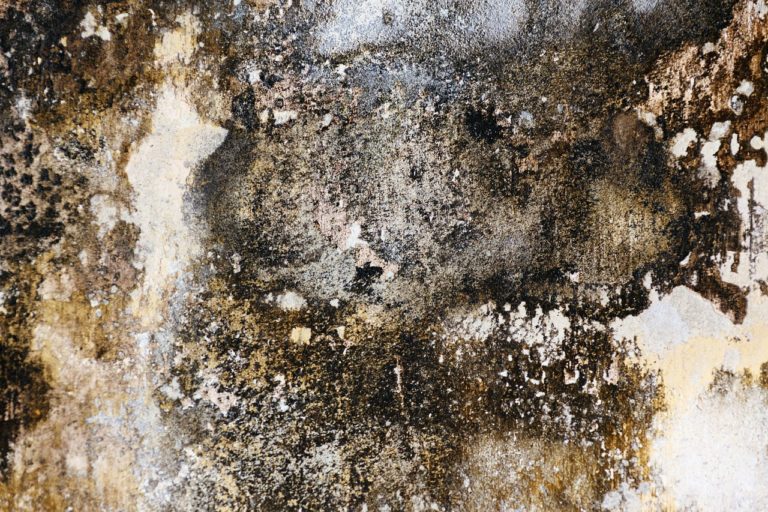
Molds can be the most unwanted guests to any home. They can slip into your house through the air in the form of spores, get stuck, and proliferate on damp structures until you notice untidy discolorations on your walls, ceiling, floor, and furniture. When molds infest your home, it will inevitably look unkempt and untidy. And not only that, you are exposed to some health hazards, and your home can eventually bog down if the infestation is not addressed.
Mold is a type of fungus that can travel through the air in the form of spore. When in contact with a damp structure, it can multiply to form a colony. Molds are important in our ecosystem because they help in the decomposition of organic things, but having them in our home is a serious problem
At the first sign of mold in a home, DIY solutions can be enough to stop the spread of molds. Preventive measures can also be done. Molds live in damp areas, so you should always check on moist areas in your home and keep the humidity inside your house at low levels.It may cost you some money, but it will be far worst when mold spreads to other parts of your house.
When You Cannot Trace Water Leaks
Dampness in some parts of your house, such as in the basement, kitchen, and bathroom, are caused by leaks in your water pipes. These areas are the most common sites of mold colonies. Fixing leaking water pipes will surely help in addressing the problem with molds.
When Molds Are on the Ceiling, Roof, and Exterior
Molds can cause your ceiling or walls to fall. They can also live in your roof and exterior walls of your house which are difficult to reach and clean. In the worst scenarios, molds can weaken your home’s foundation.
When Your AC System Is Infested
When molds enter the ductwork of your air conditioning system, it may be difficult to stop the spread of these harmful fungi. The spores may be carried through the air and may end up in other parts of your home. You may be inhaling them which can cause allergic reactions.
Home remedies mold removal or commercial mold remediation services?
Doing a quick Google search will show you how hiring mold remediation specialists is a somewhat controversial decision. Some people claim that mold remediation is just a cash grab, while others proclaim that it saves lives. Other people say you can handle home mold remediation yourself. The truth, as with most things, falls somewhere in the middle.
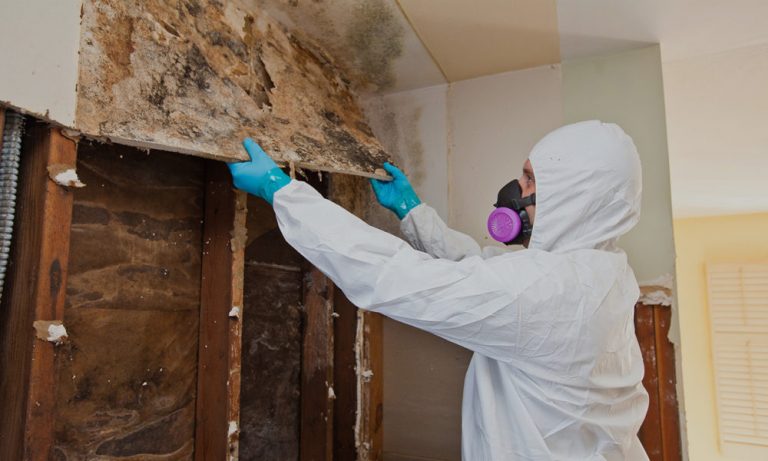
Just because you have a little bit of mold does not mean that your house has to be torn down. But, there are some scenarios when calling in the professional is a good idea. Mold can cause allergic reactions in some people and some mold—like the dreaded black mold—creates mycotoxins that are extremely dangerous to a human’s health. If not careful house mold removal can cause mold to spread and grow in other areas.
Commercial Mold Remediation Services
Mold Damage is serious and will only get worse if not taken care of. Here are a few reasons to call in professional mold / mould remediation specialists.
You are uncomfortable identifying different types of mold. There are thousands of mould species, and many look alike. For example, not all black mold is the dangerous Stachybotrys chartarum. If you are unsure about whether the mold you see is dangerous to your health, you need to call a professional mold remediation specialist.
If you have recently had a water event, such as a flood or burst pipe, then you should seek out a home mold removal service. Mold thrives in water, so it may be taking advantage of the recent water event to grow out of control in your home.
You should schedule a mold remediation is you smell a musty odor or see discoloration. A lot of mold will grow on upholstery like drapes and carpets. If you see discoloration in these places, it is likely that you have a mold problem. Most molds create a musty smell. Thus, a constant musty odor in your home could indicate a mold issue.
If you or your family begin to have unexplained health issues—especially upper-respiratory problems—you need to have a mold remediation right away. Professional services use techniques to make sure that the mold spores do not get released into your home’s air and cause further health issues.
Home mold remediation: Products for Removing Mold
If you see mold in your home, but it only covers a small area and you are not experiencing any of the symptoms listed above, then you may be able to take care of the mold by yourself. For example if you have a little area of black mold in bathroom this may be an easy fix. There are a number of products and procedures for removing mold at home. Home mold removal can be an inexpensive fix if found early. Mold can spread quickly and will cause mold damage that can become expensive to fix if not properly treated.
Home Mold Testing Kits
There are also a number of home mold testing kits available. While they are not as effective as a professional examining your home, they will let you know if you have mold in your home. If you are worried about having a mold outbreak, then we recommend picking up one of these kits. Finally, make sure to read the labels on your mold cleaning product of choice. The instructions will tell you how to use the product most effectively and how to keep yourself and your loved ones safe.

The Levels Of Mold Remediation
The most important thing in cleaning mold is to see the levels. Before you hire mold remediation, you have to consider whether you need professional help or not. Sometimes, you may need to save your money for other needs because you still need to fix other things in your house. Mold could be another problem when you neglect it. That is why the first thing before you decide cleaning it is by seeing the levels of mold remediation. We all know that it is not easy to identify the problems, but when we have read the guide, it is pretty easy to identify the level.
The importance of seeing mold level is to know whether you need to clean by yourself or call professional for it. The level of mold could be defined based on the size of your stuff. The higher level requires professional to clean the mold. We provide the understanding of mold levels is to make sure that you will not take a too fast decision in hiring professional because when you have enough professional equipment, you still can clean the mold by yourself without spending money and also you can save more money for other needs. Here is the level of mold remediations you should understand before you take action.
As we have mentioned before, the levels are considered based on the size and place of mold living. The first level is around 10 square feet or even less. What you have to do to clean the Level I mold is by cleaning it using commercial mold cleaner All you have to prepare is your health condition first and also the equipment. Make sure that you are healthy and not suffering asthma or allergies. You also need to make sure that your hands and face are protected properly.
Wear mask and glove when you want to clean mold level 1. Level 2 mold is around ten up to 30 square feet. Do the cleaning twice and vacuum moldy stuff or area you have cleaned. You can call professional service if you need it. Level III is 30 to 100 square feet. It is a big one, so you need mold remediation to clean the mold. Level IV is bigger than 100 square feet. It could be the biggest one and of course you cannot do DIY mold cleaning. The last level or level V is mold infected in AC system or HVAC. You have to call very professional service to clean the mold.
How to Clean Mold
A small leak in your kitchen turns into a black spot on the ceiling. An unventilated bathroom grows mold in the shower. Wherever there’s an excess of moisture in your home, unsightly (and unhealthy) mold is likely to follow. To learn how to clean mold from walls and furniture and even HVAC systems
They walked us through how to clean a small amount of mold on your own, plus how to tell when it’s time to call in the pros. More than just an aesthetic issue, untreated mold can cause breathing problems, trigger allergies, and even damage walls and furniture, so this is one home maintenance task you’ll want to tackle ASAP.
How to Tell If You Have Mold in Your House
“Visible growth may seem like an obvious sign you have mold, but don’t forget to use your sense of smell,” Sometimes a small amount of mold is assumed to be dirt, or mold may be lurking out-of-sight in your HVAC system—this is where your sense of smell comes in. “Is there a strange, earthy smell in your home that won’t go away, no matter how much air freshener you spray? Mold may be at the root of the issue.” That earthy scent is caused by microbial volatile organic compounds (MVOCs), or the gases produced by mold. If you suspect that mold may be hiding in your home’s air ducts, call in the pros to inspect your HVAC system and run tests for mold.
When to Clean Mold Yourself
“The general dividing line between homeowner cleanup versus professional remediation is whether the mold is covering under or above 10 square feet,” Also consider the location of the mold and how involved its removal might be. If there’s mold on drywall, removing it could reveal even more mold behind the finished surface, resulting in a more complex process. Plus, those with mold allergies should probably leave the cleanup to the pros.
How to Clean Mold
What You’ll Need:
Gloves
Googles
N-95 face mask
Liquid dish detergent
Scrub brush
Soft sponge or cloth
Follow These Steps:
Before you get started, protect yourself by wearing rubber gloves, unventilated googles, and a properly fitted face mask.
Mix a solution of dish detergent and water in a bucket. If you’re cleaning a non-porous surface like a cabinet or vanity, dip a brush into the solution and use it to scrub the mold away. For more delicate surfaces, use a sponge or soft cloth.
Absorbent materials that have gotten moldy, like carpet or drywall, will typically need to be removed. Once mold gets into fibers or porous materials, it can be very difficult to get rid of the mold completely.
Once all of the mold has been cleared away, make sure the area dries completely—after all, moisture is what got us into this situation in the first place. Use a cloth to dry off furniture, or open windows or set up fans to speed up the drying process.
Pro Tip: Avoid painting or caulking moldy surfaces. It may cover up the mold, but it’s not guaranteed to stop its growth and could lead to peeling paint later.
Mold Prevention Tips
1). Make sure you sprinklers are not getting the sides of your home wet. Replace spray types with bubbler type if with in 3 ft. of your home. Make sure you are not over watering.
2). Regularly check under sinks, toilets and behind the refrigerator if it has an ice maker.
3). If you have a flood, get it dried out immediately, don’t hesitate to call in a specialist with dehumidifiers not just fans.
4). Regularly check the evaporation drain tube for your HVAC system, these can put out 3 or more gallons of water a day and if it gets plugged up it can drain directly into your home.
5). Change the HVAC filter every 3 months.
6). Use a vacuum cleaner with a HEPA filter.
7). Open a window in the bathroom when showering and run the exhaust fan during and after showering to remove all steam.
8). Make sure all planters, slabs and walkways are below slab and sloped away from the home.
9). Do not have plants growing on or very close to the walls of the home.
10). Check and repair your roof after every wind storm.