CAN YOU PAINT FURNITURE WITH WALL PAINT?
When you are a homeowner, every penny counts. But can that leftover interior paint be used for anything besides walls? Turns out, it can!
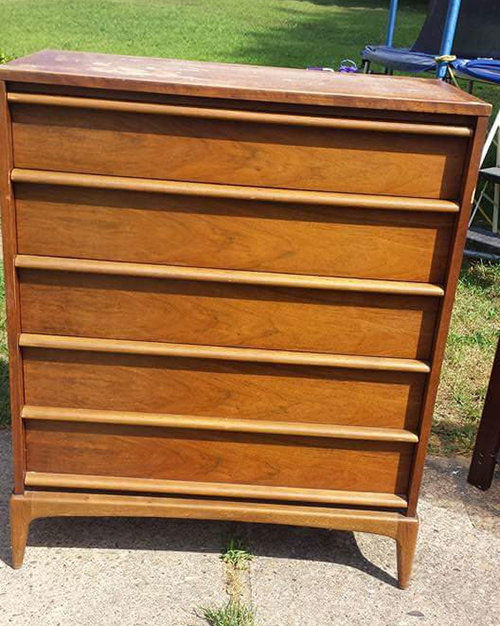
I bought this Lane dresser from a friend a few years ago, and as the way it always seems to go, I never quite got around to fixing it up. But then – an idea came to me. Since I wanted this piece to eventually go in the bedroom, I wondered if I could redo it in the same color as the freshly-painted walls? I had some paint left over and an inspiration in mind, so I went to work!
As you can see in the before picture, this dresser was in decent shape. It’s very solid and heavy, but the top was a little rough. To start, I gave the top, sides and drawer fronts an overall cleaning with some to remove the any grease and dirt. Furniture polished for years with Pledge and Endust type of products, which are silicone based, should be cleaned prior to refinishing, or you’ll have problems with paint or stain adhering. Plus, a good cleaning is always a must before starting your project.
I next scuffed up the surfaces with my Festool Random. (Sidebar: WHY did I wait so long to get a sander?) This is a good practice anytime you are repainting or refinishing a wood project, whether you use a sander or sand by hand. It gives the paint something to “grab” onto vs. sliding off a slicker surface. Be sure to wipe off any dust left behind.
I chose to leave the drawer fronts and the legs of the dresser in the wood tone and use the paint for the top and sides. The leftover paint of choice was Paint & Primer, satin finish, in “Owlet” – a nice taupey color with a soft blue undertone that I paired with “Blue Cashmere” for the rest of the room. The paint is an acrylic latex paint and primer in one that cleans up with soap/water, and goes on really nice. After taping off where the painted areas met the part I wanted left wood, I applied 2 coats, drying several hours between coats, with a 2ʺ brush.
Tips for painting bathrooms
Bathrooms and wet rooms have particular environmental factors which are unique from the rest of the home. Water, steam, heat and cleaning products can be tough on the decoration so professional products are often needed to ensure the best possible finish.
Considerations before you start:
Is the room well ventilated? Are there windows? This will influence the condensation build up within the room. Are you decorating near/in the shower? If so choose an appropriate waterproof coating.
Cover all fittings to prevent paint splatters
Decorating a bathroom or wet room will usually mean fittings, fixtures and tiling will already be installed so need to be worked around. Help avoid paint splatters by covering fixtures and fittings (including the bath!), Easy Cover from Tesa is particularly suited to covering large areas and provides the ideal protective barrier against any painting mishaps.
Drop a sheet down to protect the floor
Dust sheets such as the ranges from ProDec and RoDo will protect the floor from any paint spillages.
Prepare the surface
Preparation is key to ensuring a long lasting finish. Taking time to get the best foundation before painting or wallpapering will help illuminate issues which may arise after decorating such as damp or cracks and chips in the substrate.

Painting and Decorating Prices: How Much Is Too Much?
If you’ve ever had to paint your entire house, you’ll know how tiring and frustrating it can become. Yes, you might rush into your new home with enthusiasm, and apply that first coat of colour in the first week as you stamp your mark upon the place.
Painting and Decorating Prices
On average painting and decorating prices are around $160 per day. Prices in are likely to be a little higher. This means you should expect to pay between $375 and $500 to paint an average size room. You may get it a little cheaper if you have a bigger job.
Experience Costs Money
There are a number of factors to understand when you’re considering painting and decorating prices. Firstly, remember that most of the quote will be for labour costs. This means that prices will vary considerably, not only regionally, but because of skill level too.
Unsurprisingly, London is the most expensive area to get decorators in. But even in other areas, prices may still remain high because quotes are from skilled and experienced professionals. It’s definitely wise to weigh up the pros and cons of hiring those starting out compared to tradesmen who’ve been in the job for years. Anyone can splash a coat of paint up, but cutting in, covering up damp and getting a consistent finish aren’t always easy.
Extras Will Eat into Your Budget
If you’ve only budgeted for painting, then you may get a nasty surprise when a painter turns around and explains the amount of additional work they need to do. For example, damp patches can’t just be painted over with the final colour, but need a sealant added first.

Everything You Need to Know About Paint Finishes
Here’s what you need to know about four main paint finishes—flat, eggshell, semigloss, and gloss—and the best bets for where to use them in your home, along with a few more stand-out paint ideas. Remember: There are no set rules for how certain paint colors look in each finish; that decision is totally up to you
The Difference Between Satin and Semigloss Paint Finishes
While semigloss and satin paint finishes have some characteristics in common (both are great for high-traffic areas and are easy to clean with just a damp cloth), there are differences you should take into account. Primarily, it’s important to remember that satin paint will show any flaws in its application (i.e. brush strokes), so if you’re a first-time DIY painter looking for something durable yet forgiving, consider opting for semigloss instead.
Choose the Right Sheen
Picking the right shine level for your space is important. Not only will it impact how a color looks during certain times of day (that gray-green might look more blue than you expect!), but darker colors will naturally have more sheen, because they contain more colorant than lighter paint colors. So if you’re going dark and dramatic in your room but still want to hide some imperfections, you might opt to go down a finish in the shine department.
Pick the Best Ceiling Paint
Ceiling paints and wall or trim paints are not interchangeable. If you’re doing a full-room makeover, paint the ceiling first, then your walls and trim. Pick paints specifically formulated for ceilings, which are designed for uniform coverage and to minimize cracking. While white is standard, feel free to branch out and try a light or fun color to offset and coordinate with darker-colored walls or highlight moldings and trim. If you’re feeling daring, a dark color can add visual pop or lower a high ceiling visually.
What You Should Know About VOCs
VOCs are volatile organic compounds: chemical compounds in paints that evaporate (off-gasing) into the air of your room post-painting for months or even years after painting. That distinct paint smell? That’s, most often, from VOCs. These emissions can be irritating to those with health considerations such as asthma and allergies. Paints labeled low-VOC must have fewer than 50 grams of VOC per liter for flat paint finishes. Those labeled zero-VOC must have fewer than 5 grams per liter.

Must Have Painting Tools
I have painted almost every room in our home now. Make that almost every room in two homes! You could say that over the years I’ve learned a few tricks of the trade and have acquired quite a few painting tools. But, only a handful are my tried and true gear that get pulled out for every painting job.
Painter’s tape is a necessity for clean lines. I’ve been using ScotchBlue for years and I can tell you that the painter’s tape you used 5 years ago has changed. ScotchBlue is constantly researching and developing better painting products every year. We always have a supply of ScotchBlue in my tape drawer and we definitely go through it!
I used to be a taper and taped off every room we painted. (Now, I’ve gotten much better at cutting in with just a brush.) In a desperate attempt to save time, I bought this paint tape dispenser and was thrilled to shave some time off my taping tasks. You can watch a brief video here. I still tape off some edges when I know it will take me more time to be meticulous than to tape off some trim.
I have a no-frills metal paint tray. It has legs that can hook onto a ladder, which comes in handy when painting high on a ladder. This paint tray is the first and last tray you’ll ever need because you can line it with plastic grocery bags for easy clean up and for protecting the tray from a multitude of layers of paint.
Okay, I know you already know how much I love my cordless drill. Which is why you’ll understand why I jumped at buying this paint stirrer drill attachment just to have an excuse to pull out my drill for another project! Honestly, unless you like the slow process of thoroughly mixing old paint or blending colors, you’ll want one of these for your own. It makes your paint super smooth and creamy. Mmmmm.